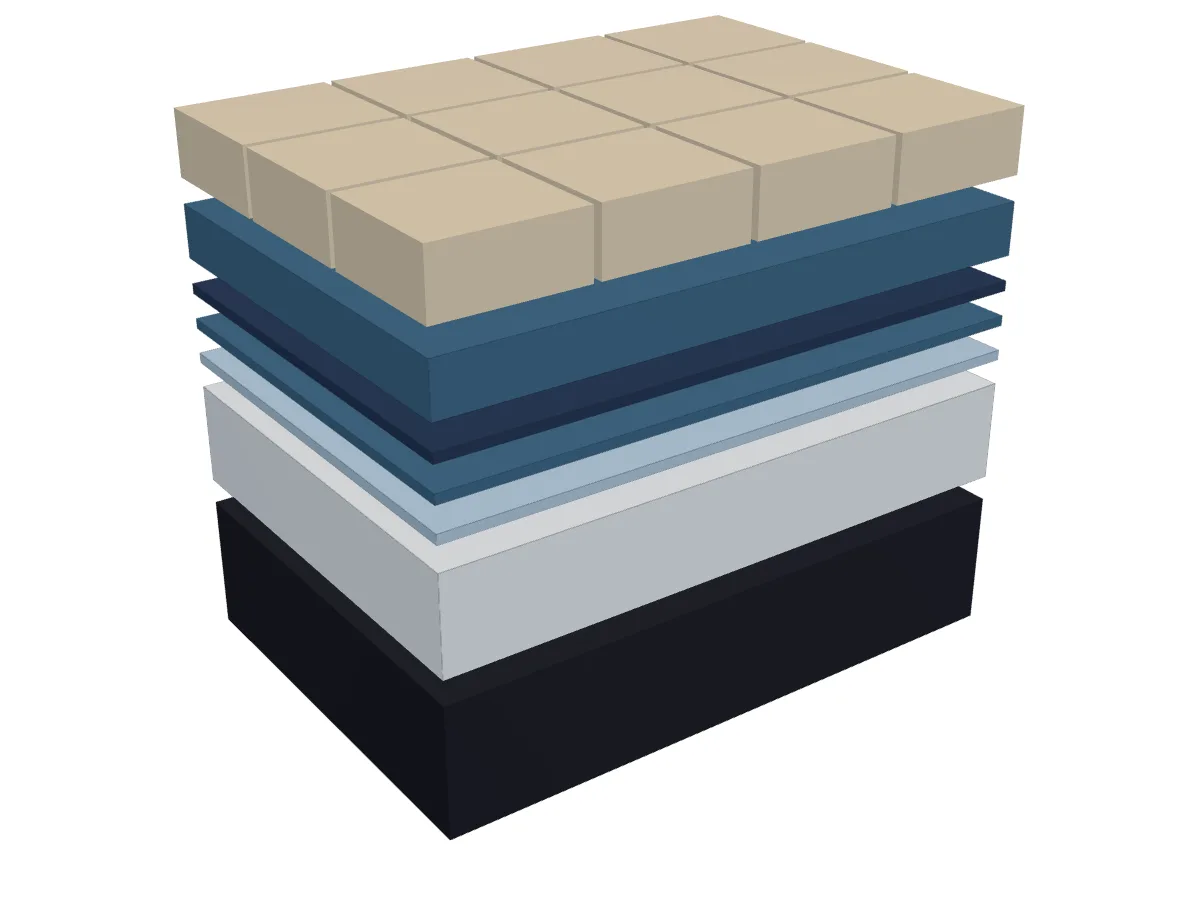
The layer sequence for waterproofing a wet area under tiles on a UAE site: screed to falls, primer, two coats of membrane, tape, drain, flood test, adhesive.
In a wet area the waterproofing goes between the screed and the tile. The sequence from the slab up is a screed laid to falls, a primer where the data sheet asks for one, two coats of a cementitious or liquid membrane applied in cross directions with tape bedded into the first coat at every corner, upstand and pipe, a clamped or bonded drain detail, a flood test once the membrane has cured, and then a C2 class adhesive and the tile. Each layer does a job the next cannot. This guide walks the sequence as a consultant checks it on a UAE site, names the membranes Lapiz Blue stocks, and works out the quantity for a plant room.
Why does the membrane sit between the screed and the tile?
Tiles and cement grout are not waterproof. Grout absorbs water, the joint at the wall opens as the screed shrinks, and water that passes through sits on whatever is underneath. If the membrane sat under the screed, that 40 mm of sand and cement would stay saturated for the life of the building and the water would reach the drain slowly or not at all. With the membrane directly under the adhesive the water has one path: over the membrane and down the falls to the drain.
The second reason is movement. The screed cures and shrinks, the slab deflects under load, and the junction with the wall opens a hairline crack. A membrane classified under EN 14891 is tested for crack bridging, which is what the O1 or O2 in a class such as CM O1 refers to. A screed has no crack bridging at all. Put the membrane where the cracks appear and it bridges them. This is the arrangement the model below shows: slab, screed, primer, two coats of membrane, adhesive bed and tile, with the tape sitting in the corner between the coats. The same logic applies to the pool shell and the plant room floor, not only to shower rooms.
Where do the falls go, the screed or the adhesive?
In the screed, every time. A tile adhesive bed is 3 to 6 mm thick under a notched trowel, and its EN 12004 class is tested at that thickness. A fall of 1 in 80 across a 3 metre room is 37.5 mm at the high end, which no adhesive can build and no tiler should be asked to. The screed is laid to falls of 1 in 80 to 1 in 100 towards the drain, finished with a wood float so the membrane has a key, and checked with a straightedge before anything goes on it. A ready to use screed such as Topcem Pronto, classified C30 F6 under EN 13813, gives a known strength and a known drying time, which matters when the membrane is waiting for it.
The screed must be cured, dry to the limit on the membrane data sheet, and sound. Laitance is ground off, dust is vacuumed, and any crack wider than a hairline is repaired before the membrane goes on. The membrane then follows the falls exactly, and the adhesive bed above it keeps a constant thickness so the tile surface carries the same fall to the drain.
Does the screed need a primer before the membrane?
Where the membrane data sheet asks for one. Two component cementitious membranes normally go onto a screed that has been dampened and allowed to lose its surface water, with no primer. Ready mixed dispersion membranes are more sensitive to a dusty or very absorbent screed and the sheet may call for a diluted acrylic primer such as Primer G first. The primer evens the suction of the screed, binds residual dust, and stops the pinholes that appear when air escapes a dry screed through a wet coat. In the model the primer is drawn as a thin layer for exactly this reason: it is a preparation, not a thickness. Read the sheet on the product page and follow it, because a primer the sheet did not ask for can reduce adhesion as easily as one it did ask for and did not get.

Tap the model to open the layers, then turn it to see how the tape sits in the corner between the two coats and how the adhesive bed keeps a constant thickness over the falls made in the screed.
How are the two coats, the tape and the corners applied?
The first coat is brushed or rolled across the whole floor and up the upstands. While it is still wet, the tape is bedded into it at the floor to wall junction, in every vertical internal corner, around the top of kerbs and along any joint in the screed. Preformed internal and external corner pieces go where two runs of tape meet. The tapes stocked for this are Mapeband, weber Band and Aquastop 120, each matched to its own membrane. Liquid membranes that are reinforced across the whole floor, such as Laticrete 9235 Waterproofing Membrane, have their fabric laid into the first coat the same way; for a cementitious membrane a strip of Mapetex Sel or weberdry Fabric FX is the equivalent over a crack or a joint.
The second coat goes on once the first has set to the point the data sheet describes, usually a matter of hours in UAE conditions, and it is applied at right angles to the first. The cross direction covers the thin lines a brush leaves and brings the membrane to the total dry thickness the sheet states. Upstands are carried to at least 100 mm above finished floor level in a general wet area and to the full splash height in a shower zone. In a plant room the upstand runs to the top of the kerb or to the height the consultant has specified, which in the worked example below is 1.2 metres. Nothing is scratched, trafficked or tiled until the second coat has cured.
How is the drain detailed and when is the flood test done?
The drain is the point where the membrane stops and most leaks start. Use a drain body with a clamping flange or a bonding flange, carry both coats of membrane onto the flange, and clamp or bond it as the drain maker shows. Pipe penetrations get a preformed gasket such as Mapeband Gasket, bedded in the first coat and covered by the second. The screed falls finish at the drain rim, and the grate finishes level with the tile face so there is no lip holding water back.
The flood test comes after the membrane has cured for the time on its data sheet and before any adhesive. Plug the outlet, fill the floor to 25 to 50 mm, mark the water level, and leave it for 24 hours. Check the mark, inspect the soffit and the adjoining rooms, then drain and photograph. The consultant will ask for that record. If the test fails, the membrane is dry enough to repair with a local coat and the test is repeated. Where our sister company Sixty Newton Technical Services LLC applies the system, the flood test and the photographs are part of its method statement.
Cementitious or liquid membrane: which should the specification call for?
Two component cementitious membranes are the default on a UAE site. They bond to a damp screed, they take a cementitious tile adhesive without argument, and they are classified under EN 14891 for use under bonded tiles. Mapelastic Smart is classified CM O1, weberdry 116 FX is the Weber equivalent and the one in the Weber wet area model, and Kerakoll offers Aquastop Nanoflex and Aquastop Flex, the latter carrying an EN 1504-2 classification as a coating. Where the floor is a pool or is in contact with chlorinated water, the class needs the P suffix: Mapelastic Zero at CM O2 P or the one component Monolastic at CM O1 P.
Ready to use liquid membranes trade mixing for speed. Mapelastic Aquadefense Zero is classified under EN 14891 for waterproofing under tile and is applied straight from the pail. Laticrete 9235 Waterproofing Membrane is a liquid rubber applied with its fabric, and Pidilite's Morcem Dry SF Plus carries an EN 1062 classification on its sheet. Liquid products want a drier substrate and a stricter check on total thickness, because a thin coat is easy to leave and hard to see. Choose by substrate moisture, programme, consultant preference and whether the area holds water, then read both sheets. The Mapei waterproofing line and the waterproofing supplier page list what each branch holds.
Which tile adhesive goes over the membrane?
A cementitious adhesive of at least class C2 under EN 12004, and C2 S1 where the tile is 600 by 600 mm or larger, back buttered. Compatibility is confirmed on both data sheets, never assumed. The pairings we quote most are Mapelastic Smart under Keraflex Maxi S1 Zero, classified ISO 13007-1 C2TE S1; weberdry 116 FX under webercol Pro at C2TE; Aquastop membranes under H40 Gel at C2 TE S1; and Laticrete 9235 under Laticrete 254 Platinum. Pidilite's Pegoland Flex, C2 TE S1, pairs with Morcem Dry SF Plus.
Grout the joints with a CG2 WA class grout such as Ultracolor Plus, classified CG2FWA, and seal the perimeter and the drain rim with a silicone rather than grout, because that joint moves. Epoxy grout is specified where chemical exposure or constant immersion demands it. The tile adhesive supplier page sets out the classes by tile size and substrate, and the Mapei brand hub explains how the authorisation letter and sheets are issued for the submittal.
How much membrane does a 24 m2 plant room take?
Take a plant room 6 m by 4 m with a 1.2 m upstand all round and one floor drain.
- Floor area: 6 × 4 = 24 m2.
- Perimeter: 2 × (6 + 4) = 20 m.
- Upstand area: 20 × 1.2 = 24 m2.
- Total membrane area: 24 + 24 = 48 m2. No deduction for the door, because the upstand runs through as a kerb.
- Coats: two, so the rate is applied twice.
- Rate: see the data sheet on the product page, which gives kg per m2 per coat or kg per m2 per mm. To show the arithmetic only, with a nominal 1.5 kg per m2 per coat: 48 × 1.5 × 2 = 144 kg.
- Allowance: add 10 per cent for the texture of the screed and the tape bedding: 144 × 1.1 = 158.4, call it 159 kg. Divide by the kit weight on the product page and round up to whole kits.
- Tape: floor to wall junction 20 m plus four vertical corners at 1.2 m each, 4.8 m, total 24.8 m. Add 10 per cent for overlaps: 27.3 m, so order 28 m, plus four preformed internal corners and one gasket for the drain.
- Primer, if the sheet calls for it: 48 m2 at the rate on the primer page.
Replace the nominal rate with the figure on the data sheet of the membrane you choose; the sheet, not this example, sets the number of kits.
What to send us
Send the room dimensions, the upstand height, the number of drains and pipe penetrations, or the BOQ line itself, on WhatsApp, and the quotation comes back with membrane, tape, corners, gaskets and adhesive counted against the data sheets, which arrive with the quote. Trade and project pricing is set up through the trade account.
Questions this guide answers
Does the waterproofing go under the screed or under the tile in a wet area?
Under the tile, directly on the screed. Tile and cement grout let water through, and a membrane under the screed would leave the screed permanently wet. With the membrane between screed and tile, any water that passes the joints runs over the membrane and down the falls to the drain, and the membrane bridges the hairline cracks that open at wall junctions.
Can the falls to the drain be made in the tile adhesive?
No. A tile adhesive bed is 3 to 6 mm thick and a C2 class adhesive is tested at that thickness. A fall of 1 in 80 across 3 metres is 37.5 mm, which cannot be built in adhesive. Falls are made in the screed before the membrane goes on, checked with a straightedge, and the adhesive stays at a constant thickness.
Why are the two membrane coats applied in cross directions?
A single brushed or rolled coat always has thin spots along the stroke direction and pinholes where air escaped the screed. The second coat, applied at right angles once the first has set, covers those thin lines and brings the membrane to the total dry thickness on the data sheet. The tape is bedded into the first coat so the second coat locks it in.
How long should a flood test on a wet area last?
Twenty four hours is the usual requirement. The membrane must first cure for the time on its data sheet. The drain is plugged, the floor is filled to 25 to 50 mm, the level is marked, and after 24 hours the mark is checked and the soffit or adjoining rooms are inspected for damp. Photograph the result for the consultant before tiling starts.
Which tile adhesive class goes over a liquid applied membrane?
A cementitious adhesive of at least class C2 under EN 12004, and C2 S1 for tiles of 600 by 600 mm and larger. Both the membrane data sheet and the adhesive data sheet should confirm the pairing. Reaction resin adhesives are used where the membrane maker specifies them, for example under epoxy grouted mosaics in pools and showers with chemical exposure.